Worried that inexpensive hosting will not meet your expectations? Then try hosting from HostGator. You get cPanel to monitor your WordPress website.
HostGator Hosting
Web Hosting is one of the essential things that is required to set up a website. Buying web hosting is quite easy, but you need to choose a quality reliable hosting provider.When it comes to good hosting, HostGator is one of the best in the industry.
In this article, I’ll show you a step-by-step guide on how to sign up and buy hosting from HostGator.
How to Buy HostGator Web Hosting
- After you visit HostGator Homepage, click on View Web Hosting Plans
- Select HostGator Web Hosting Plan
- Now Select your preferred HostGator Web Hosting Plan, I recommend you start with the HostGator Baby plan as it offers unlimited hosting features.
- Now select at least one year cycle to save some money. Then click on Buy Now button.
Select a Domain Name
Now you’ll be redirected to a new page, here you’ve to enter your domain name.
You have two options, you can register for a new domain on HostGator or transfer an existing domain name. If you already own a domain name then select I already Own This Domain.
If you don’t have a domain name, you can register a new domain name from GoDaddy or NameCheap at cheap rates. Domains usually cost around $10.
You may find this helpful: How to Link Custom Domain to HostGator
Here you need to fill in your valid Name, Email ID, Address, Phone number, and other details. It’s necessary to provide a valid phone number as they might call you for verification purposes.
Hosting Package and Account Information
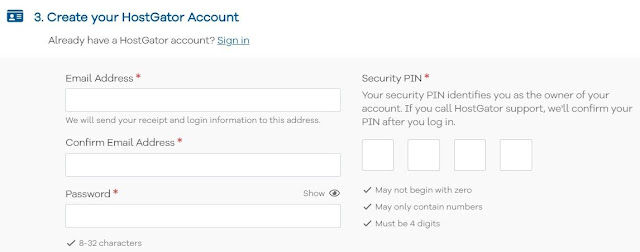
- Now Fill out the Hosting Package and Account Information
- Select a Username and Security PIN for your Hosting account. Also, make sure you’ve selected your preferred hosting package and duration correctly.
Billing Information
Here you need to fill in your valid Name, Email ID, Address, Phone number, and other details. It’s necessary to provide a valid phone number as they might call you for verification purposes.
Billing
Once you have filled all the necessary details, the next step is to select your preferred payment method. You'll have the option to make your payment through PayPal or Credit Card. If you select PayPal as a payment method, you’ll have to log in to your PayPal account on the payment page.
HostGator offers some Addons like; Domain Privacy Protection, Site Backup, SiteLock, etc. If you don’t need these add-ons, just uncheck the boxes.
HostGator Addons
HostGator offers some Addons like; Domain Privacy Protection, Site Backup, SiteLock, etc. If you don’t need these add-ons, just uncheck the boxes.
Review your order
In the last step, you can check and review your order details like the Hosting plan, addons you selected, due dates, etc. Make sure to check you’ve used the discount Coupon Code.After reviewing your order details, Click on CREATE ACCOUNT.
As per your preferred payment method, you will be taken to the PayPal payment page or Credit Card gateway page.
After making payment, you’ll get an email confirming your order with details. You might also get a phone call from them to verify your order.
After Confirmation, you’ll get your cPanel details through email. Now you can check your account just by logging in to your cPanel.


COMMENTS