How Do Google Web Stories Work And What Are Its Benefits?
What Are Google Web Stories?
Just like you see stories on Instagram or Facebook, the idea behind Google Web Stories works the same. The user sees images with text or small segments of video in front of him and taps them to switch until he watches to the end.
However, a little advantage that you can get using Google Web Stories is the ability to embed stories not only on a specific site and for a specific circle of people, but to publish them directly in search results which help attract more visitors to your site or application.
How Do Google Web Stories Work?
Unlike Stories on social networks, Google Stories have an unlimited lifespan with the aim to provide information to the users that are ready and quick to consume.
Why Use Web Stories by Google?
Google continues to reinvent itself and adapts more precisely to new trends in order to provide its users with new and optimized services.
Google Web Stories' main goal is to offer different content that can be used instantly. While social media stories last for 24 hours, Google Web Stories have an unlimited lifespan!
Benefits of Using Web Stories by Google
Stories attract the attention of users. People spend hours scrolling through Instagram stories, thereby not allowing them to come out of it. Therefore, sharing content on Google Web Stories will just work for your own website.
How Do I Sign Up For A Google Web Story Account?
To create your own Web Story, just follow the below steps:
- Go to [makestories.io ##eye##] and click on the Sign-Up button.
- You can sign up using your Google or Apple ID, or can simply go for the 'Sign Up With Email' option.
- Once you are signed in, click on the My Workspace button.
- Now just click on the General Settings link and fill in some basic details beforehand so that you don't have to do this afterward.
- Details include entering Author Type (i.e. if you are working as an individual then choose Person, else Organization), then enter your name under Author Name text field, and so on. Check out the images included for a better understanding.
- [message]
- Note
- Here I have filled in the details keeping in mind that I am running a blog Homies Hacks and working individually.
Remember to keep on clicking on the SAVE DETAILS buttons that are there in each section.
Scrolling down you'll see an option to enter your Google Analytics tracking ID which you can find by going to your google analytics account [Visit Your Google Analytics ##eye##] > Admin > Tracking info > Tracking Code.
Scrolling down further you'll get an option to enter your Adsense details to earn money via Google Web Stories. Simply create a new ad slot in your Adsense account and then enter your publisher id and the ad slot id in the respective fields.
How to Create Google Web Stories?
Once you are signed in and have filled in with the basic details mentioned above, click on the Create New Stories button.
In the new window, you'll be provided with various Editing tools using which you can start creating your Web Stories easily.
Creating Web Stories is all about creating animated slides (minimum of 5 slides is required for your 1 web story to get accepted by Google). These slides must include images, text (heading/description) and then you also experiment with adding videos or apply some animations to your texts or photos, etc. The options to do all these are available on your MakeStories.io dashboard.
Don't forget to include the link to your webpage/app or etc after adding a button to your web story. In this way, people who will check out your stories can click on the button to check out your link.
You'll have access to Unlimited Library to choose your favorite background color, fonts, media, elements, audio & more to create your attractive stories.
In addition, you can also choose some ready-made templates and then edit the fields to match with the content that you are trying to promote or share among the readers.
So just explore a little and let me know if you face any problems as I am always here to help you guys.
Don't Worry Just Do It!
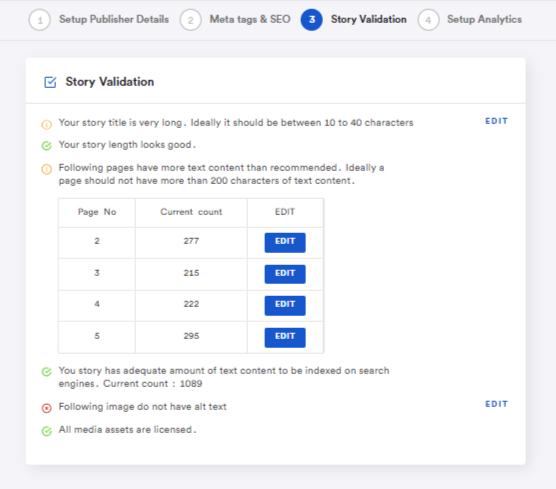
While creating stories if you get confused or if you think of missing out on a few points, then don't worry just after you click on the Publish button, you'll get to see a notification screen informing you about some of the editings that you need to do in order for your story to get published.
After you see your errors, simply click on the Edit button next to each of your error sections and make the required changes.
Once everything is ok, you'll green color check marks on the section and you will be all set to publish your story by clicking on the Publish button.


COMMENTS